
How To Sew Spaghetti Straps?
A spaghetti strap is a thin strip of fabric typically used to support a garment while leaving the shoulders bare.
For thin spaghetti straps, especially those made from delicate fabrics like silk or chiffon, a narrow and strong stitch is recommended. Using a straight stitch on your machine set to a shorter stitch length (around 2.0 mm) can provide the necessary strength while keeping the seam allowance minimal.
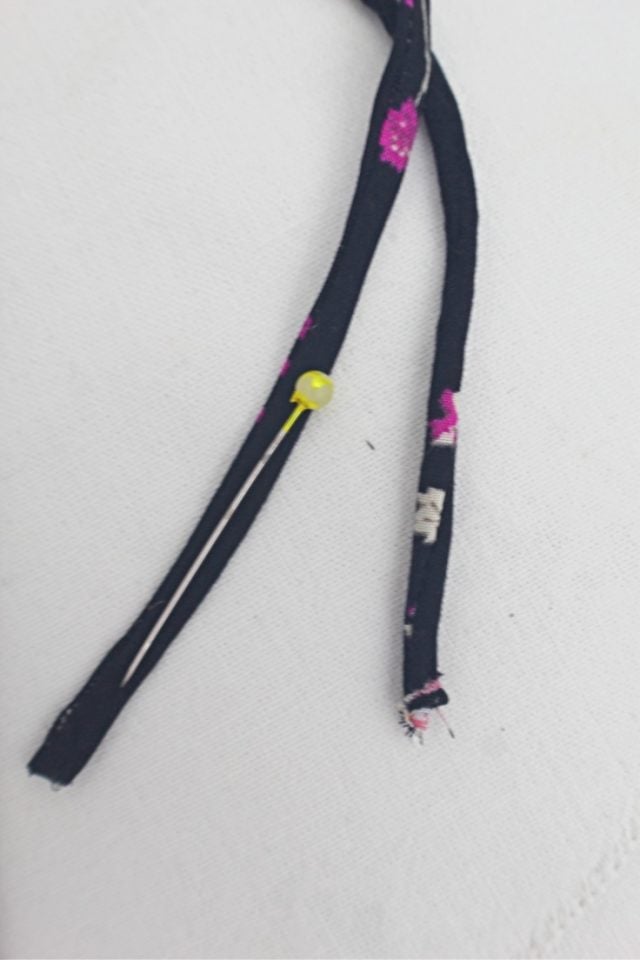
To prepare to make spaghetti straps, first, insert a pin into one end of the fabric tube. Then, pull the safety pin through the tube, and insert the fabric right side out. Once turned, sew along the length of the strap to secure the edges, and it’s ready to be attached to the clothes.

Step-by-step spaghetti straps tutorial
Here’s a detailed step-by-step spaghetti straps tutorial, the easiest method:
Prepare the fabric strips
Cut your fabric strips according to the desired width and length for your spaghetti straps. For thin spaghetti straps, aim for a width of around 1/2 inch (1.27 cm) or narrower. The length will depend on your specific project, but it’s a good idea to make them a bit longer than needed to allow for adjustments.
Fold press and stitch along the length
Take each fabric strip and fold it in lengthwise with the right sides facing each other. Press along the fold to create a crease.
Using a machine set to a straight stitch and pull a small seam allowance (about 1/4 inch or 6 mm), stitch along the entire length of the fabric lane, leaving one end open. Backstitch at the beginning and end to secure the stitching.
Trim and turn, attach to garment
Trim any excess fabric from the seam allowance, leaving a small amount to prevent fraying. Use a pin or loop pull to pull the woven fabric tube on the other side. Gently guide the same fabric through the narrow opening until the strap is turned side out.
Determine the placement of the spaghetti straps on your garment and pin them in place with the raw edge aligned. If you’re making thin straps, you may need to stretch them slightly to fit the desired width.
Secure with machine sew
Using a machine stitch to set to a straight stitch and a small seam allowance, stitch the straps to the garment along the desired placement. Backstitch at the beginning and end to secure the stitching.
Finish the ends
If the ends of the spaghetti straps are open, crease them over twice to encase the raw edge and stitch them closed. Alternatively, you can leave the ends open for a more delicate look.
Trim any excess threads and press the spaghetti strap and garment with an iron to ensure a polished finish.

What’s the best way to finish the edges of spaghetti straps for a professional-looking result?
The best way to finish the edges of spaghetti straps for a professional-looking result is by using a combination of trimming the seam allowance and turning the straps side out. Here’s how to do it:
Trim the seam allowance
After that, you make spaghetti straps and trim the seam allowance to reduce bulk and create a smoother edge. Use sharp scissors to carefully trim the excess fabric close to the stitching, taking care not to cut into the stitches.
Turn the straps wrong side out
Use a loop turner or safety pin to turn the straps side out. Attach the loop turner or safety pin to the other end of the strap and gently guide it through the tube until the entire strap is turned side out. This process may require some patience and finesse, especially for thin straps.
Press the straps
Once the straps are turned the other side out, use an iron to press them flat. Pressing the straps helps to create a crisp edge and ensures a professional finish.
Topstitching
To further enhance the professional look of the spaghetti straps, you can topstitch along the edges using a zipper foot on your sewing machine or needle and thread. This adds a decorative touch and helps to keep the edges flat and secure.
Attach to garment
After finishing the edges of the spaghetti strap, attach them to your garment according to your desired placement. You can sew them directly onto the garment using a sewing machine or hand-sew them in place for a more discreet finish.
By following these steps to finish the edges of your spaghetti straps, you can achieve a professional-looking result that adds a polished touch to your garment.
Are there any common mistakes to avoid when you make thin spaghetti straps?
When sewing spaghetti straps, there are several common mistakes to avoid to ensure a successful outcome. Here are some of them:
- Using the wrong fabric: Using fabrics that are too thick or stiff can result in bulky or uncomfortable spaghetti straps. Choose lightweight and flexible fabrics that drape well for the best results.
- Not cutting strips on the straight grain: Cutting spaghetti straps on the bias or off-grain can cause them to stretch or distort during your sewing. Always cut fabric for spaghetti straps on the straight grain to ensure stability and proper shape.
- Incorrect strap width: Spaghetti straps that are too wide can overwhelm the garment, while straps that are too thin may not provide enough support. Aim for a width that is proportionate to the garment and provides the desired level of coverage and support.
- Over-pulling during the process: Pulling too hard or forcefully during this process can cause the fabric to tear, especially if the straps are thin. Use gentle, gradual pressure when turning the fabric side out to avoid damaging the straps.
- Not pinning properly: Failing to pin the fabric streaks securely before sewing can result in uneven or crooked seams. Take the time to pin the fabric accurately along the seam allowance to ensure precise sewing.
- Ignoring raw ends: Leaving raw ends or unfinished edges on spaghetti straps can result in fraying or unraveling over time. Always finish the raw ends of the strips either by folding and sewing or using a serger to prevent fraying.
- Using the wrong needle and seam: Using a needle that is too large or a seam that is too wide can cause visible holes or puckering along the seam line. Choose a fine needle and a thin seam allowance suitable for the fabric type to achieve neat and professional-looking seams.
- Skipping pressing: Skipping the pressing step after turning the spaghetti straps’ wrong sides out can result in uneven or wrinkled straps. Use an iron to press the straps flat and smooth for a polished finish.
By avoiding these common mistakes when you make spaghetti straps, you can ensure that they turn out beautifully and enhance the overall look of your garment.

Types of sewing spaghetti straps
When it comes to spaghetti straps, there are several types to consider, each with its characteristics and uses:
Thin and rouleau straps: Thin straps are similar to spaghetti straps but may be slightly wider or narrower depending on preference. They provide minimal coverage and are often used on lightweight or delicate garments where a subtle strap is desired. Rouleau straps are thin fabric tubes that are sewn flat and then turned right side out to create a finished strap. They have a cylindrical shape and are often used as decorative straps on dresses, tops, and lingerie.
Flat straps: Straps are wider than spaghetti straps and have a flat, rectangular shape. They provide more coverage and support and are commonly used on tops, dresses, and camisoles where a wider strap is preferred.
Make spaghetti straps: To make spaghetti straps involves cutting fabric strips to the length, to sew them lengthwise with right sides together, turning them right side out, and pressing them flat to create finished straps.
The desired length and finished spaghetti strap: Spaghetti straps can be adjusted to the length depending on the garment’s design and the wearer’s preference. They can be made shorter for a more delicate look or longer for added coverage and support. A finished spaghetti strap has been sewn, turned the fabric right side out, and pressed flat to create a smooth and polished appearance.
Strap lengthwise and thinnest straps: Spaghetti strap is typically cut lengthwise from strips, folded in half with sides together, and then sewn along the edge to create a finished strap. Spaghetti straps are considered the thinnest type of straps, providing minimal coverage and support while allowing the shoulders to remain bare.
Open edge and raw end: Spaghetti straps have an edge where the strip is turned right side out, leaving one end open for the insertion of a safety pin or loop turner to facilitate the turning process. The raw end of a spaghetti strap is the open end where the fabric is left unfinished before turning it right side out.

Needle and thread and eye end: Sewing spaghetti straps requires a needle and thread to stitch the strip together lengthwise and create a finished strap. The eye end of a spaghetti strap is the closed end where the fabric strip is sewn together lengthwise, creating a finished strap that is ready to be attached to a garment.
Tube and other end: Spaghetti straps are often referred to as tubes because they are made by folding a strip in half lengthwise and sewing it along the edge to create a cylindrical shape. The other end of a spaghetti strap is the closed end where the strip is sewn together lengthwise to create a finished strap.
Insert and thread: To pull spaghetti straps right side out, a safety pin or loop turner is inserted at the open end of the fabric strip and guided through the tube to facilitate the process. Spaghetti straps are sewn using thread that matches or complements the fabric, creating a seamless and polished finish.
