
Best Serger Stitches in 2023: With Complete Stitching Guide
You probably know, that serger stitches are one of the most popular ways how to make reliable and neat seams. For these purposes you need to your a serger, also called an overlocker.
These sergers use multiple threads to perform various serger stitches and based on the design elements, templates to name just a few. Of course, the serger stitches technique may depend on the sewing machine you have.
This article will help you find out what serger stitches are, whether are they strong enough, and know about different types of serger stitches. Also, we will discuss, how to make regular stitches using your serger.
Meeting with a serger stitch
You may have used a regular sewing machine. Therefore, you should know, that every sewing machine has its own built-in stitch or even stitches. Commonly, a straight-stitching quilter has only one stitch design that is built inside the machine. However, others have many more of them.
What is more, the built-in stitch is not the only way how you can increase the opportunities of your machinery. In addition to them, you can expand the machine’s stitch settings by adjusting some parameters like stitch length and stitch width.
Also, it would be a good idea to use a certain stitch instead of another one, and at the same time, you would spend less time.
You can check out in your machine manufacturer’s guide how do they call this type of stitch. The most usual names are:
- stitch configuration;
- stitch option;
- stitch function.
There is no doubt that the catalog of your serger stitches is approximately the same. In general, every machine has its own built-in stitches, but you can create an individual stitch that would be convenient for you to use.
On the other hand, it is important to remember, that different serger stitches should be used differently.
Serger stitch settings
Almost every serger must be adjusted by hand. You can do it exactly the same way you have done it on the regular sewing machine. More seldom you can do it using a special computer on your machine. So you can easily set the parameters you need on the levers, switches, and of course sliders.
However, you ought to know about some other settings you need to have adjusted on your own. Here they are.
Amount of the threads
Usually, the sergers may have two, three, or four threads overlock stitches. It is common for a budget to come with 3 thread overlock stitch, and in premium-class models, there are from 4-thread overlocks up to eight of them.
In fact, you would use more threads the heavier your fabric is. That’s why we recommend choosing your fabric wisely so that you don’t have a problem with it while sewing a seam, a stitch, or other elements.
The neat endings of the lightweight fabrics usually have two thread overlock stitches. And on woven fabrics and stress-bearing garment seam we can usually see other stitches, like three-thread overlock stitches, someones even use four.
Remember that you will need to work with the seam lately, so odd stitches may interrupt you.
Amount of the needles
Commonly sergers have two needles and two looper threads. That two needles must be sewn in two rows, and at this moment the thread’s looper cast it along the edges of the seam.
In some serger stitches, both needles and loopers can be used at the same time. Other stitches can be performed even with both looper threads but can use only one needle.
The next question about needles is whether to choose the right needle or the left needle something we are going to discuss in the following paragraphs. Actually, choosing the right needle or left needle is some of that you can set your serger stitches width with, but we have other options and you will like them.
Stitch length
The process of adjustment of stitch length on by-hand sewing machines and sergers is similar. The majority of them have a stitch length slider or disc that helps you to set the parameters you need.
Stitch width
At first sight, there is no universal method how to adjust the width of your serger stitch, because not every serger has a width adjustment disc. On the other hand, these procedures are suitable for most types of serger stitches.
First, you need to use the right needle for a stitch with a single needle to make a smaller stitch variant. For example, a tapered rolled hem would be an ideal option.
Oppositely to the right needle, your left needle makes your stitch a bit wider.
Optionally, you can set up the cutting width on some level, that will allow you to have a certain amount cut off the edge of the fabric.
The next thing to do is to tune in the stitch finger if there is such an option on your serger. It will help you to remove your finger when it is necessary for you.
Thread tensions
On your regular machinery, you can set up the thread tension on your top thread by hand. However, the serger has its own tension dial on every thread stretch overlock stitch.
And in this way, you can create different stitches by tuning in the tension of the thread on the same level as each other.
The differential feed of thread overlock stitch
On a regular machine for sewing, you may find only one set of specialized feed dogs that helps your fabric to feed throughout the machine. The differential feed on your serger lets two sets of your feeds move with the same speed and in the same direction.
So this allows you to create a stretchy seam and decrease the fabric compression during the work.
When you adjust your differential feed, it may become easier for you to sew knit fabrics and perform other elements. What is more, it would be extremely useful to create a sort of decorative stitch like a pin tuck, a ruffle, and even an individual seam.
Different serger stitches and how to use them properly
In this topic, we will discuss and show you the most popular options for serger stitches. Also, you will know how to create them from your stitches in case you do have not them built into your machinery.
Overlock stitches
An overlock stitch is supposed to be the based serger stitch. Commonly the series has 3 thread overlock stitch or a 4-thread overlock stitch.
As it was described before, you can easily adjust your parameters of your to make it a bit narrower or wider; the tension of the thread settings can help you in creating overlock stitch changes.
Overlock with two threads
With a two-thread overlock stitch, you can perform an accurate and strong seam that will suit your lightweight fabrics. You can use it in case you want to minimize the volume of your seam.
To make a two-thread overlock stitch you will need to use one looper thread and one more needle thread.
To create your narrow stitch from the two-thread overlock stitch, you are recommended to use your right needle. Oppositely, if you want to have a wide two-thread overlock stitch, you need to use the left needle.
Overlock with three threads
Many people believe that exactly three-thread overlock stitch construction gives your garment the necessary strength and makes it durable. That’s why you can use it almost with any type of fabric.
The creation of an overlock stitch with three threads needs to use one needle thread and more than one looper thread, it is recommended to use both of them.
At this step, a technique to make narrow and wide stitches is exactly the same as it was with two threads. For the narrow one – use your right needle, for the wide one – use your left needle.
Overlock with four threads
If you want to create a reliable and stretchy seam that you can use for heavy and knit fabrics, then it is exactly what you need.
To have a four-thread overlock stitch done, you need to use both the needles and both the upper looper and lower looper.
Methods of overlocking
For creating interesting designs for your serger stitches, you can easily adjust the settings of your machinery, for example. For sure the instructions of your serger consist of all information you need to know about this question, and you can conduct some experiments to find it out.
However, we want to offer your variations based on experts’ opinions and experience.
Two-thread overlock wrap stitch requires to use of the right needle. Next, increase the needle thread tension. After that, you need to decrease the lower looper thread tension. As usual, the right needle – is for narrow stitches, left needle – is for wide stitches.
For 3 thread overlock stitch, you need to use the needle from the right side. After that, increase the needle thread tension and lower looper thread tension, at the same time you need to decrease the upper looper thread tension.
Flatlock stitch
You should have guessed, that this flatlock stitch will allow you to create a neat flat seam. The threads can help you to deal with all the raw edges and help the seams to lie down accurately on the fabric edge to make it look attractive.
This is another way, you can choose, in case you need to have a strong seam with volume minimization.
The main goal of this type of stitch is to produce an imitation of the cover stitch. But nowadays, the cover stitch is not the only way we can use it. People use it for seams in sports gear, to make a decorative stitch, and to create a so-called ladder effect on the back side of the seam.
Probably, that’s why it is also called a ladder stitch or even a safety stitch. A common serger can produce a safety stitch with 2, 3, and 4 thread overlock. To make it narrower or wider, use the right and left needles respectively.
The easiest way to make flatlock stitch
To make up this ”safety stitch” on the piece of fabric, you need to stitch by threading with a serger for a serger stitch. After that follow the instructions:
- Increase the needle thread tension;
- Set the upper looper thread tension up to zero;
- Increase the tension of your lower looper thread.
In general, these rules are the same for every serger. But in case you have had some difficulties with it, you would better follow the serger manual instructions and pieces of advice.
Rolled hemstitch
A rolled hem is one of the best ways how to make your raw edges on a single layer of your fabric secured. We are sure, that you have ever seen invisible hem t-shirts, and it is the first step for decorative stitching.
If you have a serger with a built-in rolled hem, then you do not need to make those settings on your own. Despite the fact that your serger might have no built-in rolled hem, there is no difficulty to make it yourself.
Every rolled hem has a set of two or three threads, it may depend on the configuration of the machinery you have. So let’s analyze how to make a rolled hem by hand.
First, you need to have the cutting blade disabled, even better would be to remove it all. If there is no retractable blade, you can get it off in one step.
After that, choosing the needle makes you use a one-needle stitch, whether your rolled hem has two or three threads. As usual, we need to select the needle from the right for the narrow rolled hem and the left needle for the wide rolled hem.
For a two-thread rolled hem, you need to use an upper looper converter from your serger.
Security stitches imitation
Imitation for stitches can be used with three-thread and four-thread options, it may give you a strong stitch that will protect your garment seams.
To perform this stitches imitation, you need to use your lower looper and upper looper, two threads of the needle ought to be used too. It would a good bonus if you have found a safety stitch on your machine.
Decorative stitch with a sewing machine
In general, a serger is used to work on construction templates with it, designing and decorations are an exception, and can not be provided with every serger. Anyway, we would be pleased to introduce you to some examples of how to make the simplest decorative elements on your sewing.
Picot stitching
Picot elements can be used for a neat finishing of your pillows, chokers, and even head garments. What is more, you have the possibility to create a picot edge even if you have a regular serger without any special equipment for decorating it.

The first thing you need to do is tune in to your machine on a rolled hem mode. After that, increase your stitch length, it is supposed to have the maximum length your serger allows you to take.
Next, the tension of the lower looper must be increased in that way to allow to pull of the upper looper thread along right to the opposite side.
Of course, it is necessary to remember to pull in your cutting blade again.
Wave stitching
You can use the method of wave stitching on its own and it can be used for other stitches like a blind hem, picot stitch, and flatlock stitch.
Actually, this variant of stitching is extremely popular for certain models of machinery, like, for example, Baby Lock Imagine Wave BLE3ATW.
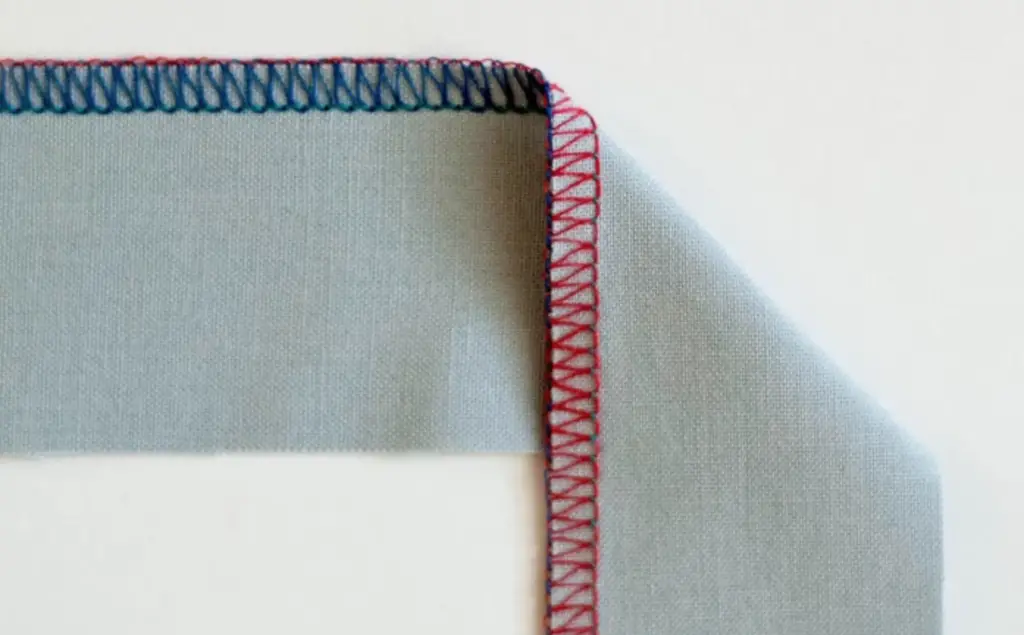
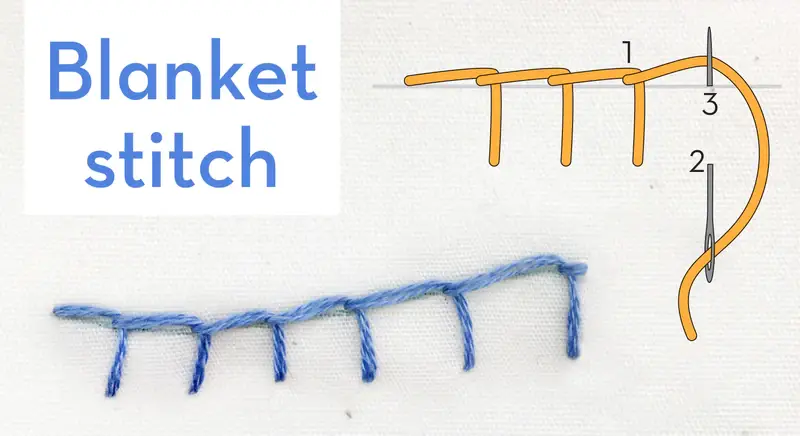
Two stitches for a blanket
Blanket stitching is an extremely popular way of making edges and seams on this type of fabric, so it can be easily made on any of the sergers. Let’s check it out.
First of all, you need to put away the needle from the right. As we did it before, adjust your machinery to the rolled & blind hem, the seam must be prepared too. This step requires removing the cutting blade.
After you have done it, set up the tension of the needle to a minimum or average level. The tension of the upper looper should be increased to its maximum, and the lower looper – oppositely, to its minimum.
That will allow to the looper from low set over the top of the seam and make your blanket look more attractive.
Chain stitch and cover stitching
Unfortunately, the common serger can not give us an opportunity to make chain stitch or cover stitching, again, it is because of the serger’s peculiarity to make up seams on the fabric in general. Making that type of stitching is a job of a cover stitch machine.
On the other hand, there is a special hybrid machine of a regular serger that can easily do both an awesome seam and cover stitch for you.
Chain stitch
The chain stitch that was made by the machine is very similar to embroidery in its structure. The best way how you can use it – connect two stitching rows or a seam on the back side of your fabric. In addition, it is one of the most common methods used on lightweight fabrics.
Coverstitching
What is a cover stitch on itself? Well, this is a combination of parallel lines stitches on the face side of the fabric, which are connected with a chain stitch to help on another one. With its help, you can produce a hermetic hem and seam that would be durable and long-living.
Top 3 professional’s overlock stitches choice
Nowadays we have a wide variety of serger stitches, and everyone can decide what should be used or not. Every people choose something simple and reliable, that they can remake easily in case something went wrong. But many professionals give advice about this topic and usually, they highlight 3 main stitches for an overlock.
- Flatlock seam. It is one of the most efficient ways how to have nice seams and not harm your product or garment. Of course, you need some more practice to perform it well in case you started sewing some time ago;
- Picot stitching. This method remains the most loved stitching in the decorative field. Its main benefit is that you do not need to have some special equipment, only your serger. Actually, it is widely used for home accessories but can capture your attention in some clothing projects with non-heavy fabric;
- Chain stitch. This stitching is good for the reasons of its similarity to embroidery sewing, it may be the biggest benefit for many people. Parallel lines used in this method connect one seam to another seam, stitch with each other on the piece of your fabric and give your template a feeling of lightness and for sure simplifies it.
We are glad that you have read our article about serger stitches and their types. We have described different stitching methods and their effect on your project, how to deal with them, and perform them as best as you can.
Expert tips and notes will allow you to use these variants during the sewing and finishing of the project to make it look nice. As well as, the best 3 stitchings on overlocks can help you to produce both lasting and attractive products.
Of course, you may have your own favorite types of serger stitches, it would be good if you share them with us and your friends who are also fond of sewing.
I hope, you have learned from this material and you will use this knowledge working on your next project. Best wishes!
5 thoughts on “Best Serger Stitches in 2023: With Complete Stitching Guide”
Leave a Reply
Related Posts
How To Sew On Velcro Strips With Sewing Machine?
How To Sew A Tote Bag With A Flat Bottom?
How To Sew Tulle By Hand?
How To Sew Fishnet Fabric?
How To Sew Quilt Squares Together By Hand?
How To Sew Polyester Fabric?
How To Sew Spaghetti Straps?
How To Do A Closure Sew-In?
How To Do A Full Sew-In Weave?

March 1, 2023 at 5:38 pm
There is no width adjustment disc in my car. So I didn’t know that I could change the stitch width. Now I want to buy a machine with this function.